Kafka Integration
To configure the Kafka integration, complete the following steps.
Step 1: Add Device
Follow the steps to Connect a Device. The device will be used to store tags that will be eventually used to create outbound topics in the connector. Make sure to select the Enable Data Store checkbox.
Step 2: Add Tags
After connecting the device in Litmus Edge, you can Add Tags to the device. Create tags that you want to use to create outbound topics for the connector.
Step 3: Add Kafka Connector
To add the Kafka connector in Litmus Edge:
- Navigate to Integration.
- Click Add a connector icon. The Add a connector dialog box appears.
- Select the Kafka SSL provider from the drop-down menu. In this guide, we are using Confluent Kafka as the Kafka broker, so we selected Kafka SSL Integration.
Complete the following information for the Kafka SSL connector as shown in the screenshot and click Add/Update.
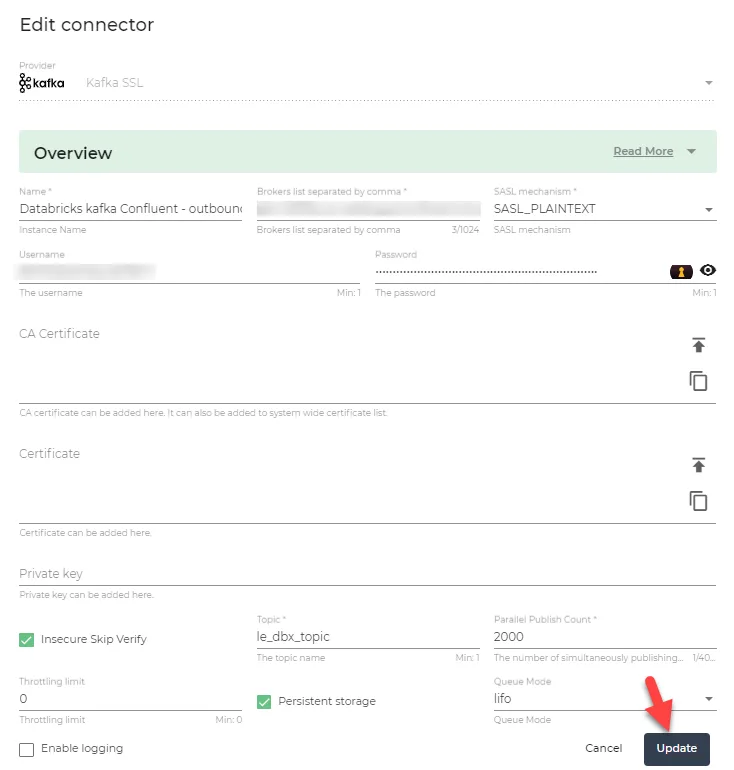 Edit a connector
- Click the kafka SSL connector tile. The connector Dashboard appears.
- Click the Topics tab.
Click the Import from DeviceHub tags icon and select all the tags to send data to Databricks.
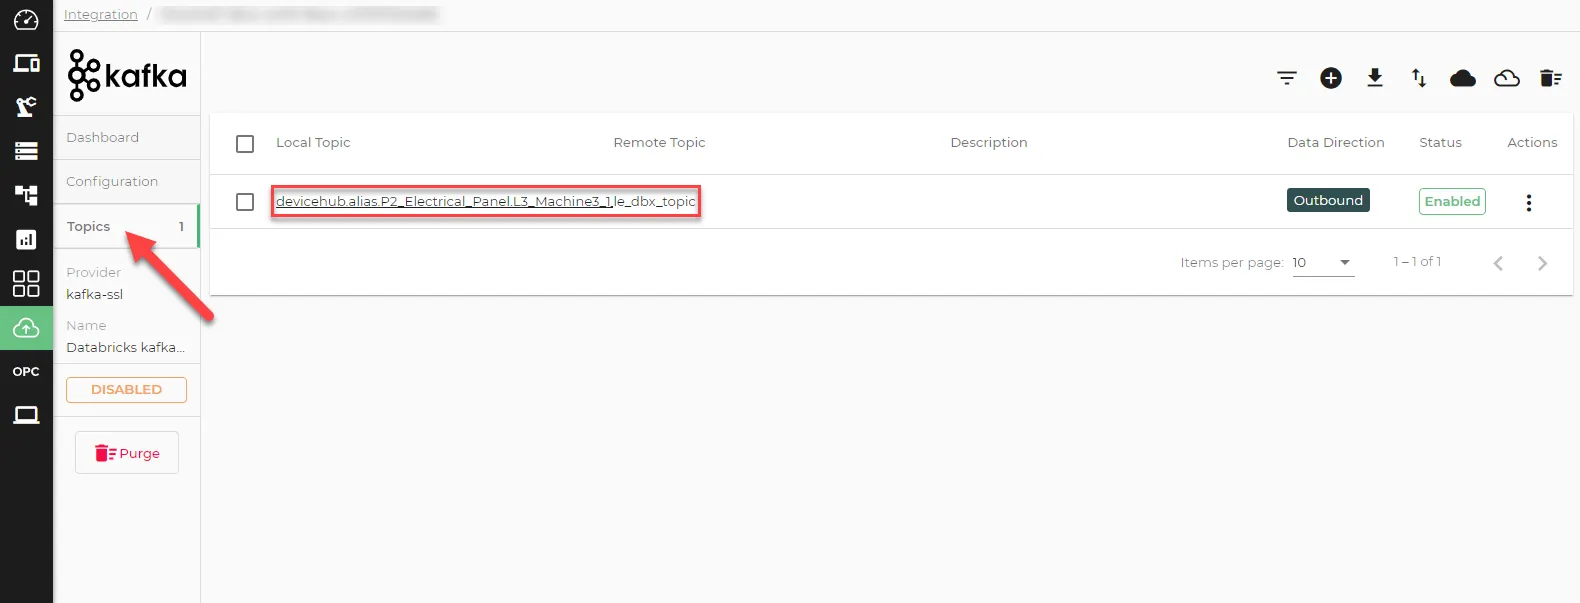 Topics tab in Kafka Connector
Step 4: Set Up Databricks for Kafka Streaming
In Databricks, you can configure Kafka connector parameters from a Python notebook file. You will need to input information about the Broker address, Topic name, and API key and secret. To set up Databricks for Kafka streaming:
1. Navigate to Databricks workspace using your log in credentials.
2. Create a new notebook in Databricks. Follow the Databricks Kafka Streaming Guide to set up Kafka streaming.
3. Once the data is loaded, it will be in the following format:
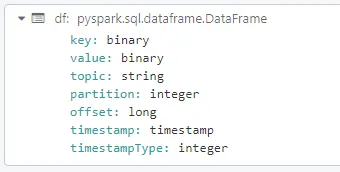
The payload sent by LE will be in the value field in binary format.
Example Notebook for Kafka Streams
Note: The user can create their own notebooks and customize them as needed. This example notebook will explain how to ingest the standard DeviceHub JSON Payload.
Open a new notebook and follow the steps:
1. Import the necessary libraries and dependencies to handle Kafka data streams and process data using PySpark.
import pyspark.sql.types as T
import pyspark.sql.functions as F
from pyspark.sql.types import StructType, StructField, StringType, IntegerType, DoubleType, BooleanType, TimestampType, LongType
from pyspark.sql.functions import from_unixtime, from_json, col, cast
2. Define the credentials and Kafka broker information that will be used to authenticate and connect to the Kafka server.
Note: End-users should use secure methods of passing their Kafka credentials.
confluentBootstrapserver = "<KAFKA_BROKER_SERVER>"
KafkaTopic = "<KAFKA_TOPIC>"
apiKey = "<API_KEY>"
apiSecret = "<API_SECRET>"
3. Configure Spark to read data streams from the Kafka topic.
Note: Ensure to include the Kafka server, security protocol, and authentication details.
df = spark.readStream \
        .format("kafka") \
        .option("kafka.bootstrap.servers", confluentBootstrapserver) \
        .option("kafka.security.protocol", "SASL_SSL") \
        .option("kafka.sasl.mechanism", "PLAIN") \
        .option("kafka.sasl.jaas.config", f'kafkashaded.org.apache.kafka.common.security.plain.PlainLoginModule required username="{apiKey}" password="{apiSecret}";') \
        .option("subscribe", KafkaTopic) \
        .option("startingOffsets", "earliest") \
        .load()
This will output the following:
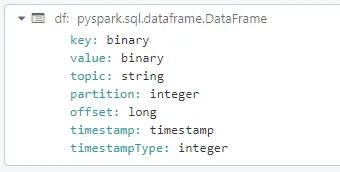
Note: This guide covers the DeviceHub JSON Payload. Please update the notebook if you are sending a different payload to Databricks.
4. Define the schema that matches the expected structure of the incoming data and parse the Kafka stream data accordingly.
# Define the schema
schema = StructType([
    StructField("deviceName", StringType()),
    StructField("tagName", StringType()),
    StructField("deviceID", StringType()),
    StructField("success", BooleanType()),
    StructField("datatype", StringType()),
    StructField("timestamp", LongType()),
    StructField("value", DoubleType()),
    StructField("metadata", StringType()),
    StructField("registerId", StringType()),
    StructField("description", StringType())
])

# Convert the binary 'value' column to string and then parse the JSON data
parsed_df = (df
             .withColumnsRenamed({'timestamp': 'kafka_time'})
             .withColumn("parsed_value", from_json(col("value").cast("string"), schema))
             .withColumn("LE_timestamp", from_unixtime(F.col('parsed_value.timestamp')/1000, "yyyy-MM-dd HH:mm:ss.SSS"))
             .select("key","topic", "kafka_time","partition","offset","parsed_value.*","LE_timestamp", )
)
This will output the following:
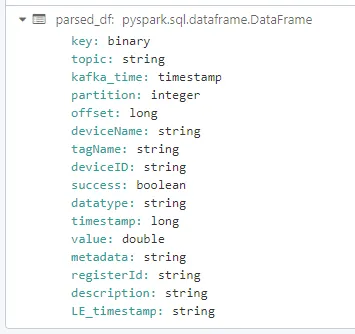
5. Specify the Databricks table where the parsed data will be stored.
table = "<DATABRICKS_TABLE_NAME>"


query = (parsed_df
    .writeStream
    .format("delta")
    .outputMode("append")
    .option("checkpointLocation", "/tmp/delta/"+ table + "/_checkpoints/").toTable(table)
)
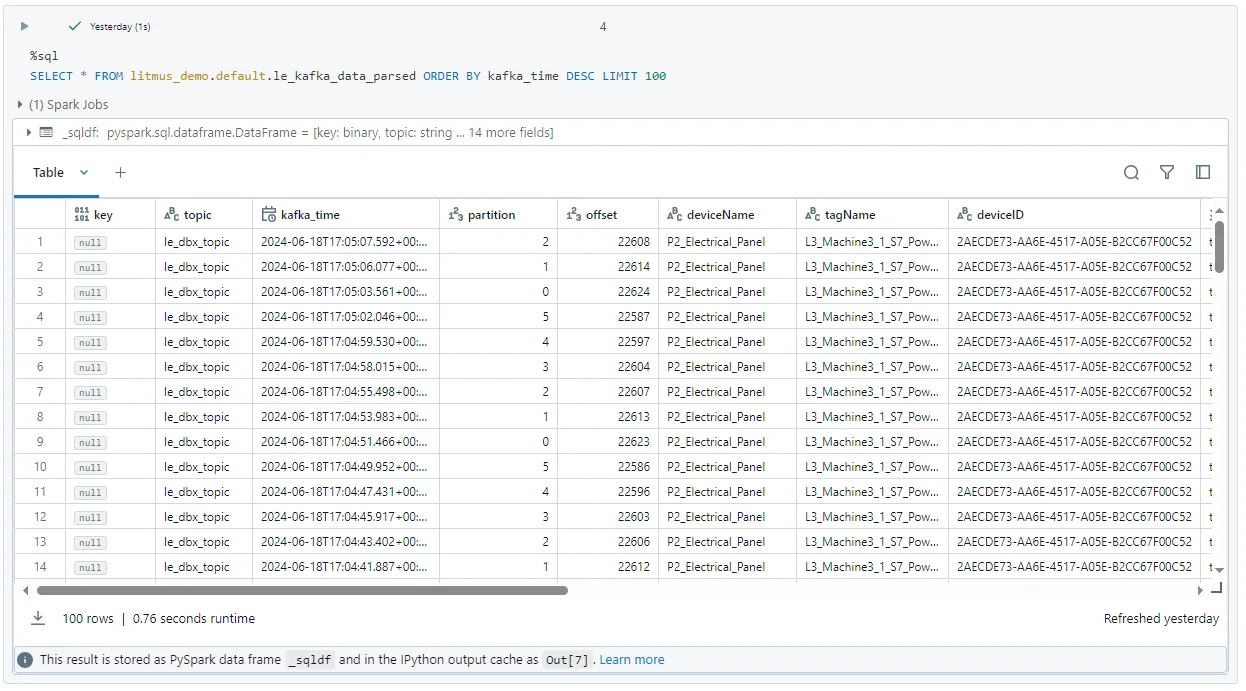
6. Once the data is published to the Databricks table, you can query the table to verify that the data ingestion process is successful.