Litmus Access Processors for Apache NiFi
Overview
The following provides an installation and usage guide for the Litmus Access Processor for Apache NiFi.
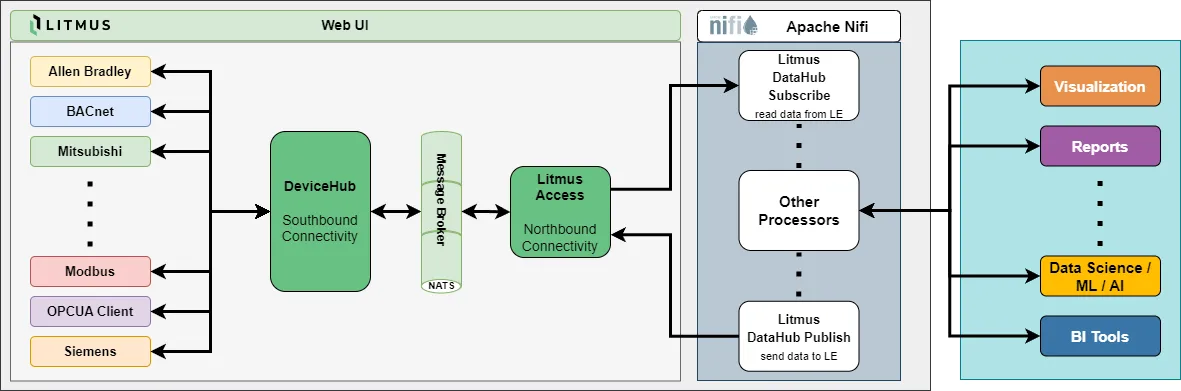
Installing the Litmus Access Processors into Apache NiFi
Requirements
The Litmus Edge Processors available via the Litmus Central Portal provide a compressed zip or tar.gz file. Both should contain the following .nar files:
- nifi-nats-processor-nar-{version}.nar
- nifi-nats-service-api-nar-{version}.nar
- nifi-nats-service-nar-{version}.nar
Ensure you have either and continue to the installation steps below.
Installation Steps
- Extract the .zip or .tar.gz file and verify you have the expected .nar files.
- Stop Apache NiFi
- Copy all of the extract .nar files into the lib folder of your Apache Nifi Installation
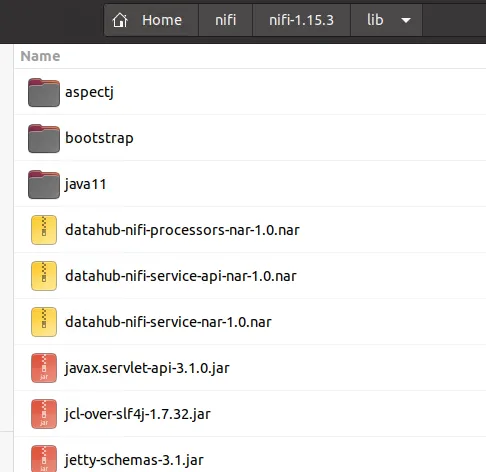
- Start Apache NiFi
- In a web browser, navigate to the Apache Nifi canvas. Accessible at https://{Host-IP}:8443/nifi. (Example https://localhost:8443/nifi)
- Login with you Apache NiFi credentials. These are set by the system admin, for more details read Apache Nifi documentation.
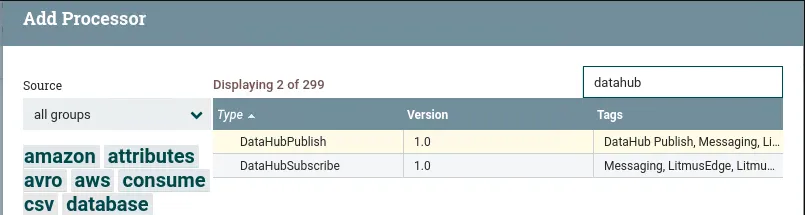
- Verify you are now able to select DataHubSubscribe and DataHubPublish processors in the canvas. If you are, your installation is complete!
Preparing Litmus Edge to communicate with Apache NiFi
Requirements
To allow Litmus Edge to communicate through Apache NiFi using Litmus Access, you must do the following:
- Create an access account with configured read and/write topics (see Create an API Accounthere for more details). Save this key as it will be used later.
Ingesting Data from Litmus Edge using DataHubSubscribe processors
Requirements
To allow that data can be ingested from Litmus Edge by Apache NiFi using Litmus Access, three requirements have to be met beforehand.
- The Litmus Access Processors for Apache NiFi have to be imported
- An Access Account with configured read and optional write topics has to be created. Verify that the access accounts has the correct read/write permissions for your desired topics.
Steps
This guide will provide instructions on how to create a DataHubSubscribe Processor in Apache NiFi to ingest data from Litmus Edge.
This section assumes familiarity with how to build an Apache NiFi flow. If you are unfamiliar with this process, refer to the Apache NiFi documentation.
Step 1: Login to the Apache NiFi flow canvas Navigate to the Apache NiFi flow canvas as `https://{address}:8443/nifi
Step 2: Add a new Processor To add a new processor, drag the Add Processor icon from the components toolbar onto the canvas.
Step 3: Select the DataHubSubscribe processor In the "Add Processor" dialogue, search for the DataHubSubscribe processor, select it, and press the "ADD" button.
Step 4: Configure the Processor Double click the DataHubSubscribe processor from the canvas.
Step 5: Modify its Properties Select the "PROPERTIES" tab.
Step 6: Configure the Topic Name
Copy the topic to be used from the Tags UI of Litmus Edge as described by the Litmus Edge user guide.
Select the Value field for the Topic Name property to bring up the value editor.
Paste the topic into the text field and press the OK button.
The topic is now set.
Topics can be
- Either for a single tag Example: devicehub.alias.PLC_RC1_CCS.HTR_HTG_RmpDowTim_SP
- All tags for a specific device Example: devicehub.alias.PLC_RC1_CCS.>
- All tags collected by devicehub Example: devicehub.alias.>
To be able to read data from Litmus Edge through the processor, the topic has to be allowed for the Access Account being used!
Step 7: Add an Access Service
Select the Value field for the Access Service property to bring up the value editor.
If no Access Service is shown by the drop down, select the Create new service option.
If an Access Account does exist, please continue at step 21.
Step 8: Create a new Access Service To add a new AccessService, press the CREATE button.
Step 9: Add the new Access Service Now press the arrow icon at the far right side to configure the new Access Service.
Step 10: Approve the new Access Service Confirm the prompt with the YES button.
Step 11: Configure the Access Service Press the gear icon at the far right to provide the required settings for the AccessService.
Step 12: Modify the Access Service Properties Select the Properties tab.
Step 13: Configure the Access URI Configure the URl which is the IP address and port used for connecting to Litmus Edge.
Select the Value field for the Access URl property to bring up the value editor.
Replace the word "localhost" with the IP-address of the Litmus Edge device. Keep the port as 9094. Press the OK button.
The Access URl is now set.
Step 14: Add an Access API Key to the Access Service
Copy the API key to be used from the Access Account UI of Litmus Edge as described by the Litmus Edge documentation.
Select the Value field for the Access API Key property to bring up the value editor.
Paste the API key into the text field and press the OK button.
The Access API Key is now set.
Step 15: Apply Changes Press the Apply button to accept the settings for the Access Service.
Step 16: Enable the Access Service Enable the Access Service through the lightning icon on the far right side.
Step 17: Confirm Enablement Confirm the enabling through the ENABLE button.
Step 18: Close Dialogue Wait for the green tick and close the window through the CLOSE button.
Step 19: Wait for Service Start Wait for the Status to change from Enabling.
to Enabled.
The window may need to be refreshed manually through the Update button at the left lower corner.
Note: If a document icon appears next to the book icon on the left side, an error occurred when trying to connect.
The error text is show when hovering over the document icon.
Step 20: Return to NiFi canvas Close the the configuration window.
The focus will now return to the NiFi flow.
Please continue at Step 24.
Step 21: Select the Service (if does not exist) If an Access Service already does exist, that Access Service can be selected from the drop down.
Step 22: Approve Selection Press the OK button.
Step 23: Apply Service Press the APPLY button.
Step 24: Build the Flow The processor is now ready and can be used to build the rest of the flow.
In Apache Nifi, processors are linked via a connection. How to setup and configure these connections can be found in the Apache Nifi documentation.
The DataHub Subscribe processor will usually be at the start of the flow as it does read data to then be processed.
If part of a flow, the triangle icon will change to a red square. Example flow:
The processor can now be enabled using the Run icon.
The run state is shown by a green sideways triangle.
How to send data from Apache Nifi to Litmus Edge
This section will provide instructions on how to setup the DataHubPublish processor for Apache Nifi to send data to Litmus Edge.
Requirements
To allow that data can be published to Litmus Edge from Apache Nifi using Litmus Access, three requirements have to be met beforehand.
- The Litmus Access Processors for Apache Nifi have to be imported
- An Access Account with configured read and write topics has to be created
How to add topics to an Litmus Access Account is described in the Litmus Documentation for Access.
Step by Step guide to publish data to Litmus Edge via Apache Nifi
This guide will provide instructions on how to create a DataHubPublish Processor in Apache Nifi to publish data to Litmus Edge using Litmus Access. This chapter will not provide instructions on how to build an Apache Nifi flow, as is it expected that user are familiar with this process. Also does Apache Nifi provide well documented instruction onto this aspect.
Step 1: Log on to Apache Nifi to be able to create a new Nifi Flow.
Step 2: Add a new processor, by dragging the Add Processor icon from the components toolbar onto the canvas.
Step 3: Select the DataHubPublish processor and press the Add button.
Step 4: Double click the DataHubPublish processor from the canvas.
Step 5: Select the Properties tab.
Step 6: The first step is to setup the Topic Name which the DataHubPublish processor will write too.
To be able to write to Litmus Edge, the topic to be used for writing has to be configured for the Access Account as described by the Litmus Edge user guide.
Select the Value field for the Topic Name property to bring up the value editor.
Enter the topic used for writing into the text field and press the OK button.
The topic is now set.
To be able to write data to Litmus Edge through the processor, the topic has to be allowed for the Access Account being used. How to setup topics for the Access Account is described by the chapter "Step by Step guide to create and configure an Access Account". Step 7: The second step is to add an Access Service, which is the configuration for connecting to the Litmus Edge device.
Select the Value field for the Access Service property to bring up the value editor.
If no Access Service is shown by the drop down, select the Create new service option.
If an Access Account does exist, please continue at step 21. Step 8: To add a new AccessService, press the CREATE button.
Step 9: Now press the arrow icon at the far right side to configure the new Access Service.
Step 10: Confirm the prompt with the YES button.
Step 11: Press the gear icon at the far right to provide the required settings for the AccessService.
Step 12: Select the Properties tab.
Step 13: The first step is to setup the Access URl which is the IP address and port used for connecting to Litmus Edge.
Select the Value field for the Access URl property to bring up the value editor.
Replace the word "localhost" with the IP-address of the Litmus Edge device. Keep the port as 9094. Press the OK button.
The Access URl is now set.
Step 14: The second step is to setup the Access API Key which is used for authentication of the Access Account.
Copy the API key to be used from the Access Account UI of Litmus Edge as described by the Litmus Edge documentation.
Select the Value field for the Access API Key property to bring up the value editor.
Paste the API key into the text field and press the OK button.
The Access API Key is now set.
Step 15: Press the Apply button to accept the settings for the Access Service.
Step 16: Enable the Access Service through the lightning icon on the far right side.
Step 17: Confirm the enabling through the ENABLE button.
Step 18: Wait for the green tick and close the window through the CLOSE button.
Step 19: Wait for the Status to change from Enabling.
to Enabled.
The window may need to be refreshed manually through the Update button at the left lower corner.
Note: If a document icon appears next to the book icon on the left side, an error occurred when trying to connect.
The error text is show when hovering over the document icon.
Step 20: Close the the configuration window.
The focus will now return to the Nifi flow.
Please continue at Step 24.
Step 21: If an Access Service already does exist, that Access Service can be selected from the drop down.
Step 22: Press the OK button.
Step 23: Press the APPLY button.
Step 24: The processor is now ready and can be used to build the rest of the flow.
In Apache Nifi, processors are linked via a connection. How to setup and configure these connections can be found in the Apache Nifi documentation.
This processor will most of the time be the last processor in a flow as it does publish data.
If part of a flow, the triangle icon will change to a red square.
The processor can now be enabled using the Run icon.
The run state is shown by a green sideways triangle.
Step 25: To verify that data are received by LE, a flow can be used using the Access node and listening to the topic used for writing.
After saving the flow, the Debug window will show the data received from Apache Nifi.
NOTE:
In case Apache Nifi is unable to reconnect by itself after a connected LE is rebooted, either restart Apache Nifi or disable and reenable the AccessService.