VirtualBox ISO
You can use Oracle VirtualBox to install Litmus Edge using an ISO file.
Video
Before You Begin
- Prepare your environment for running virtualization by using Oracle VirtualBox.
- The virtual machine will run on the same physical network card as the host environment. To ensure that the device can communicate with data sources such as PLC, DCS or CNC and can be accessed through the Web UI, make sure that communication can be established.
- Adjust the system clock for the host environment prior to installing Litmus Edge. UTC is recommended. The 15-day trial period may be rejected and invalidated by the license server if the system clock is not adjusted. If this happens, contact your Litmus representative.
- Obtain a valid file in the ISO format (example filename: <litmusedge-std_3.1.5.0-amd64>.iso). You can get the ISO file from Litmus or download it from the Litmus Central portal.
To use Oracle VirtualBox to install Litmus Edge using an ISO file, you will need to do the following.
- Step 1: Create a Virtual Machine
- Step 2: Configure the Virtual Machine
- Step 3: Install the ISO File
- Step 4: Run Litmus Edge On the Virtual Machine
- Step 5: Log in to Litmus Edge
To jump to a specific section, refer to the Table of Contents on the right side and click the corresponding step.
Step 1: Create a Virtual Machine
You will need to create a virtual machine (VM) that will be used to run Litmus Edge.
To create a virtual machine:
- Start the Oracle VirtualBox application.
- From the Oracle VM VirtualBox Manager window, click New on the toolbar. The Create Virtual Machine dialog box appears.
- If needed, toggle Guided Mode to Expert Mode. The dialog box expands.
- Enter a name for the virtual machine in the Name field.
- Select Linux from the Type drop-down list.
- Select Other Linux (64-bit) from the Version drop-down list. You can select Linux 2.6, 3.x, or 4.x (64-bit).
- Move the Memory Size slider to set the memory size. The minimum is 2 GB of (2048 MB). Select more memory if the host system permits.
From the Hard disk section, select Create a virtual hard disk now.
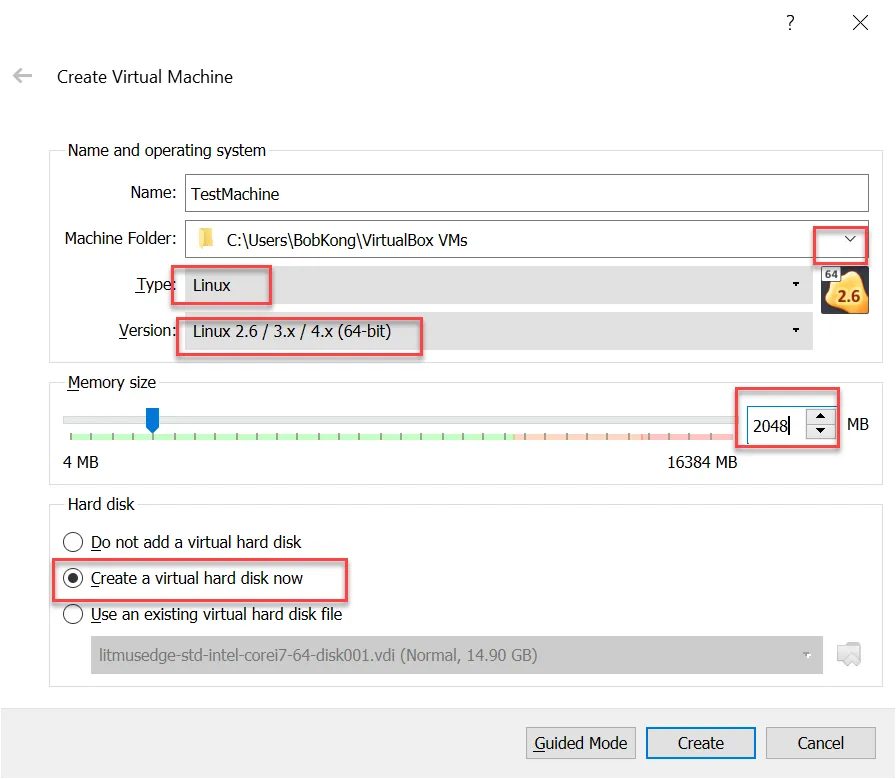 Create virtual machine dialog box
- Click Create. The Create Virtual Hard Disk dialog box appears.
- From the Hard disk file type section, select the VMDK (Virtual Machine Disk).
- From the Storage on physical hard disk section, select Dynamically allocated.
Move the File Size slider to set the file size. The minimum value is 16 GB, which enables the VM to run. This size provides the resulting VM with about 2 GB of data storage. This is enough for a small-scale PoC without much data storage on the disk. If this VM is deployed as a production system or the PoC requires more storage for databases, increase the file size beyond 16 GB.
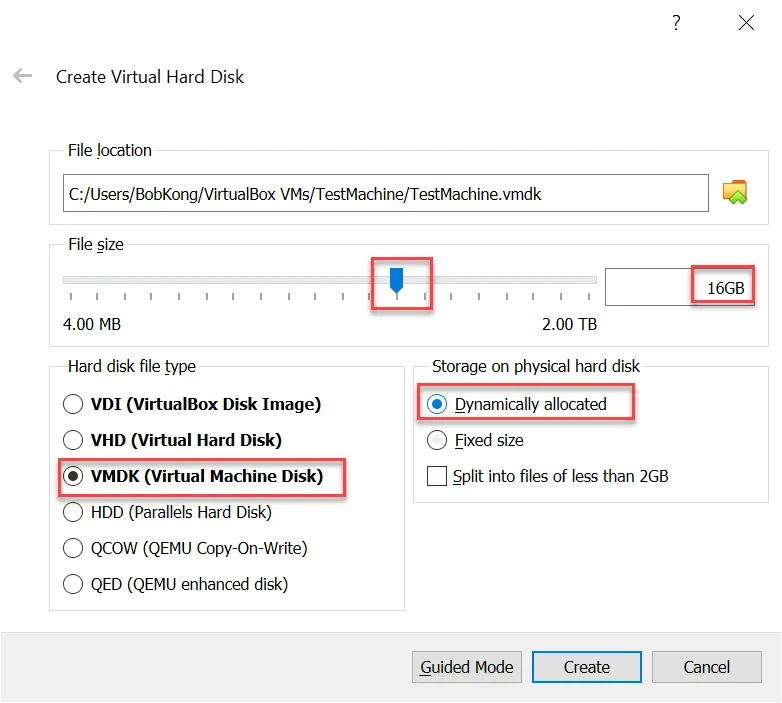 Virtual Disk parameters
Click Create. The new VM is deployed. It appears on the list in the Oracle VM VirtualBox Manager window.
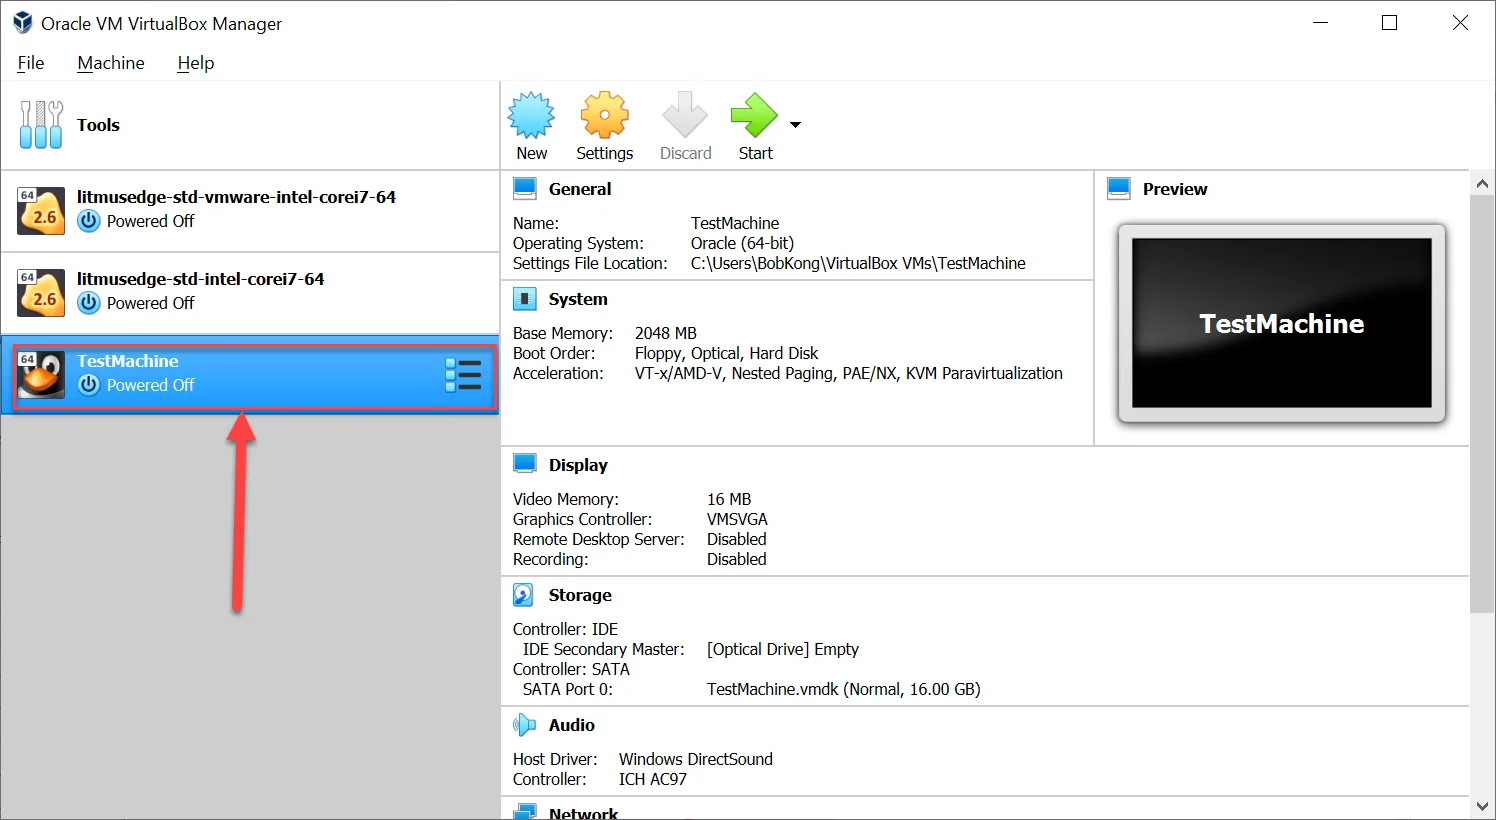 New VM listed in left pane
Step 2: Configure the Virtual Machine
After installing the VM, you will need to configure it.
From the Oracle VM VirtualBox Manager window, select the new VM on the left pane, then click Settings on the toolbar. The Settings dialog box appears.
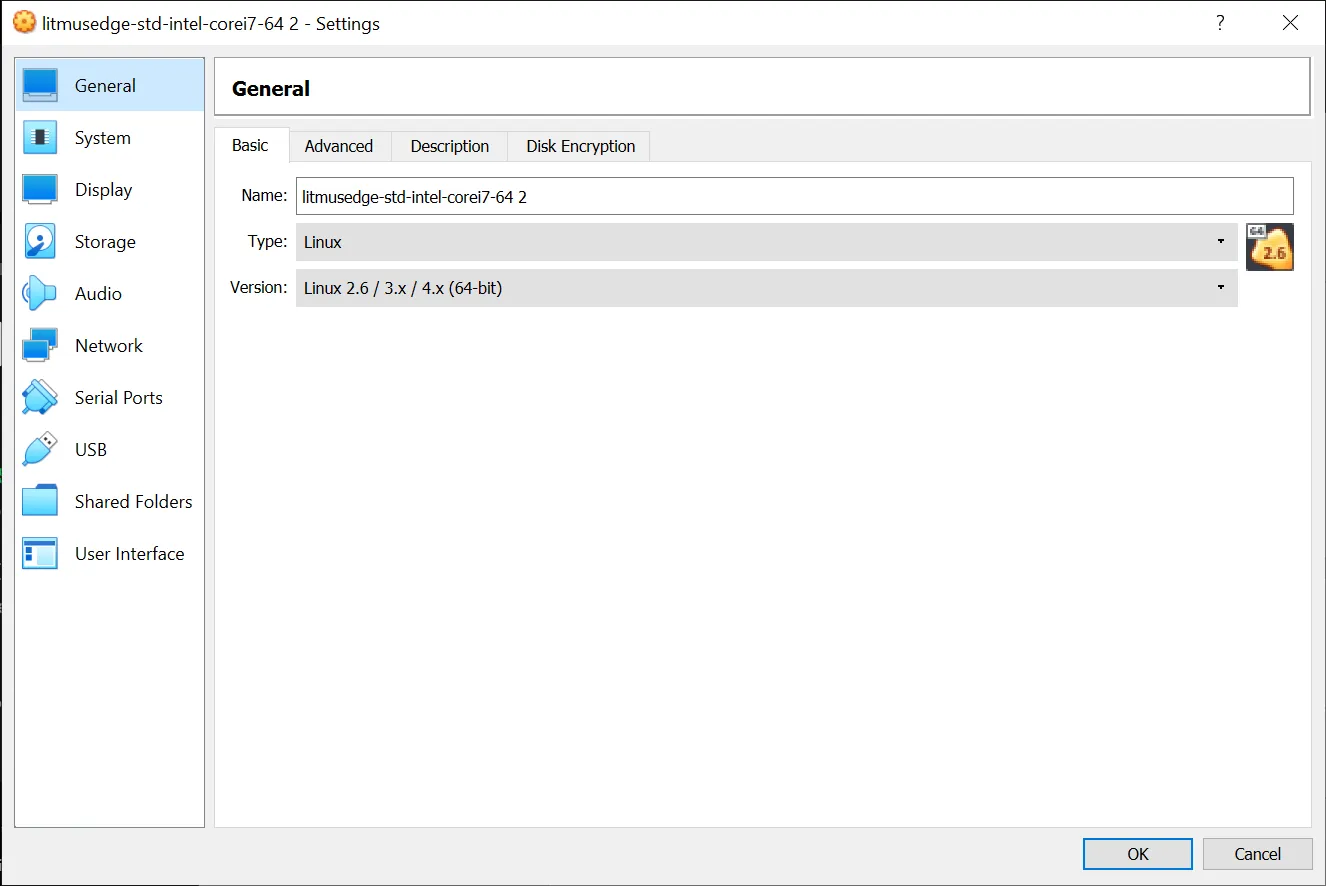
Step 2a Configure System Settings
Configure the following system settings from the Motherboard tab.
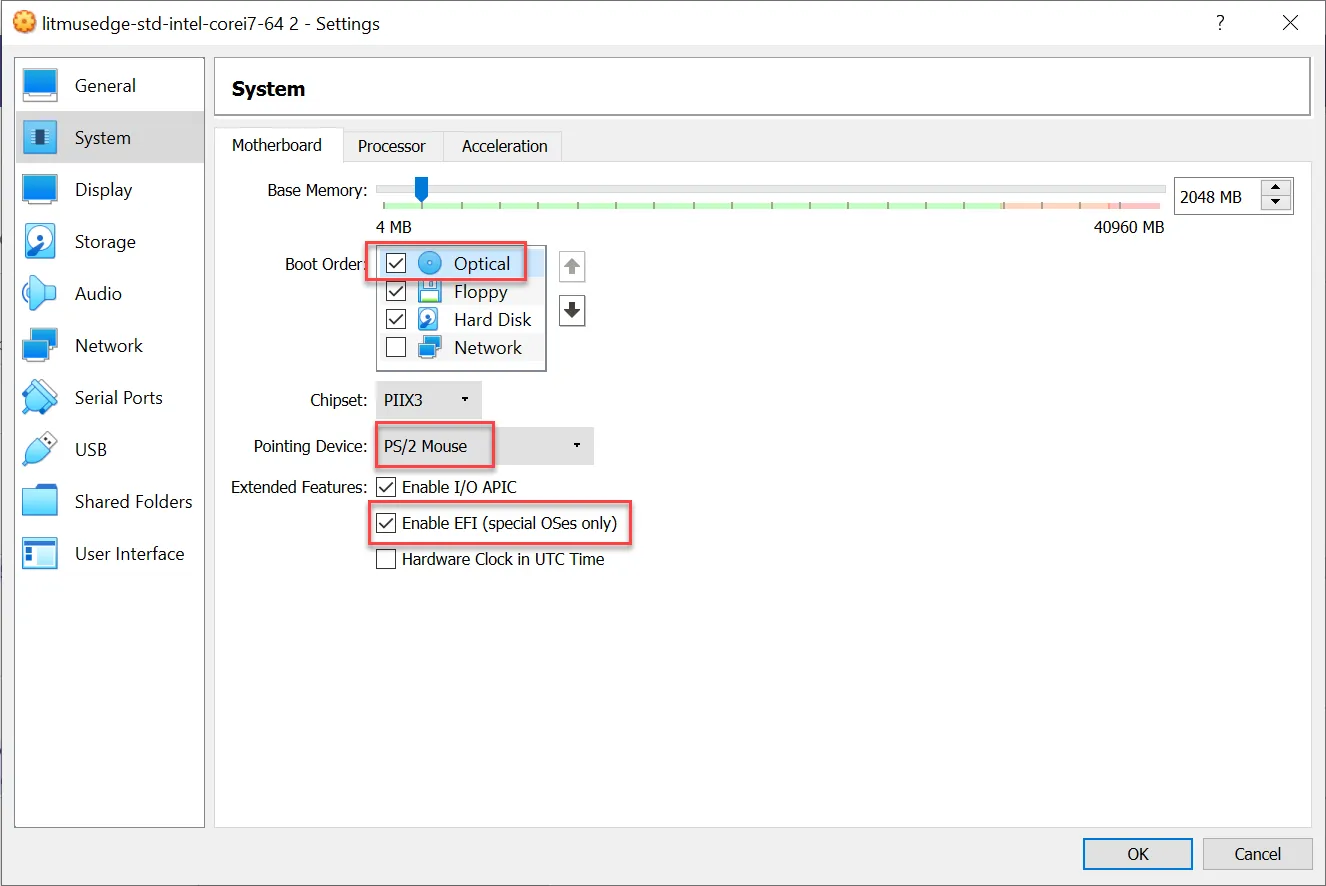
- Boot Order: Highlight Optical and click the Up arrow to make it the first item in the boot order.
- Pointing Device: Select PS/2 Mouse.
- Extended Features: Make sure Enable EFI (special OSes only) is selected.
Configure the following settings from the Processor tab.
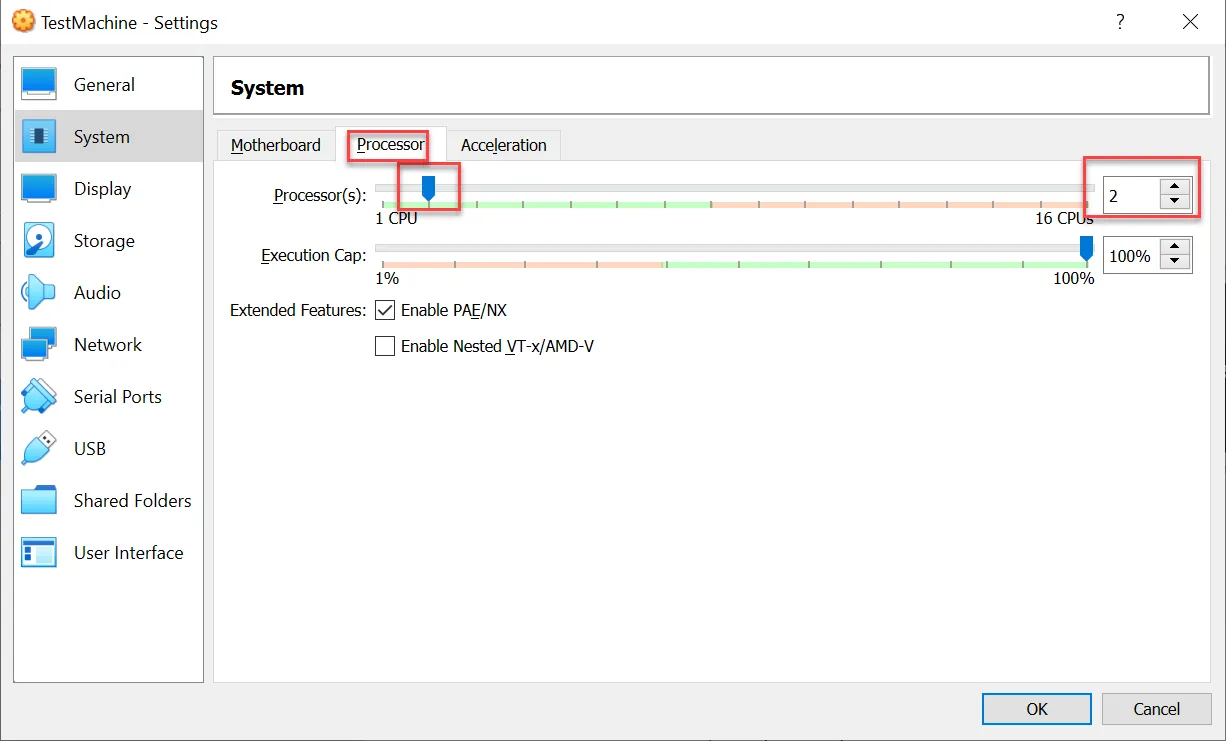
Move the Processor(s) slider to set the cores for the VM to 2 (the recommended minimum). If the host system permits or the VM is a production deployment, more cores should be allocated.
Step 2b: Configure Storage Settings
- From the left pane, select Storage.
- From the Storage Devices section, select the Controller.
From the Type drop-down list, select AHCI. If AHCI is not available, select, PIIX4. The PIIX4 option works, but displays a number of messages throughout the installation.
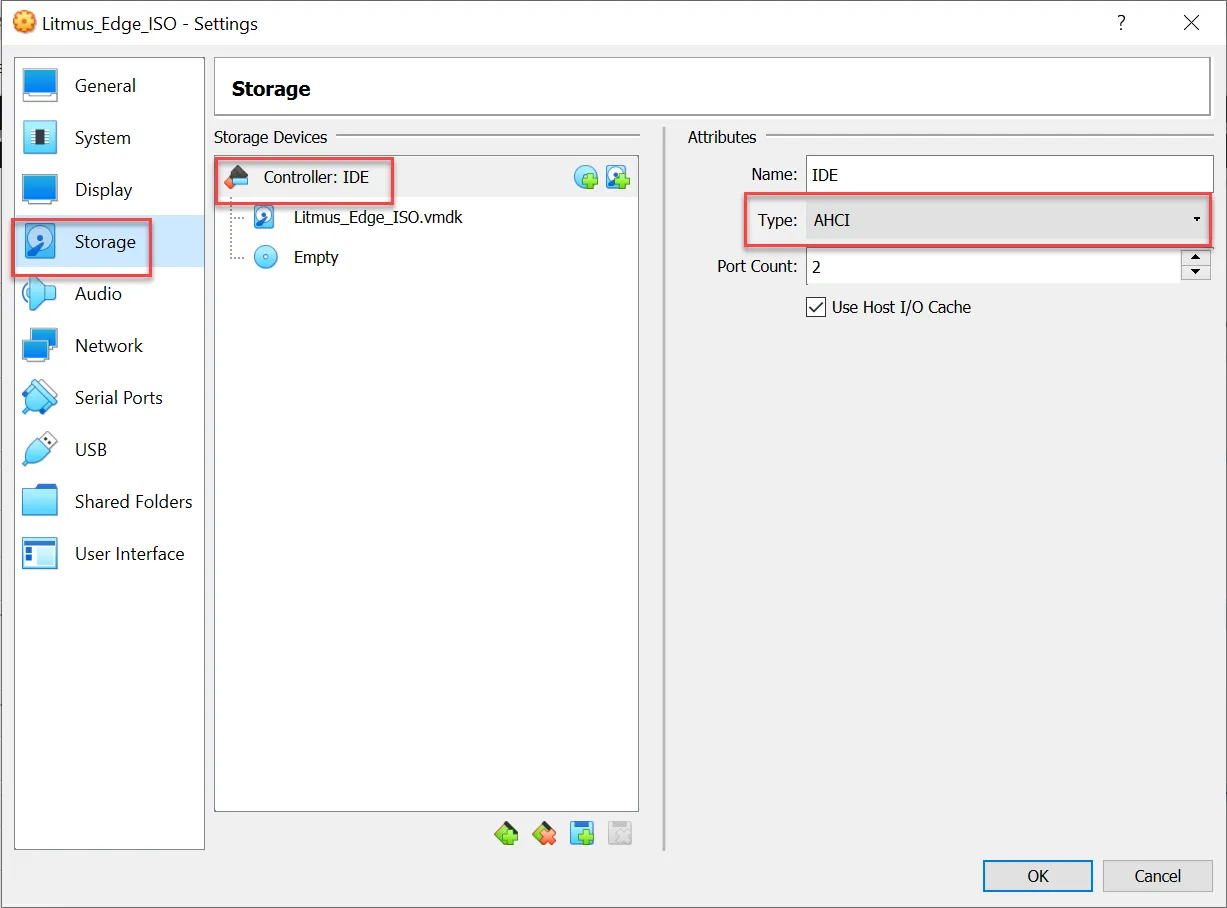 Storage controller settings
- From the Storage Devices section, select the Optical drive (currently shown as Empty).
From the Attributes section, click the Optical Drive icon and select Choose a disk file.
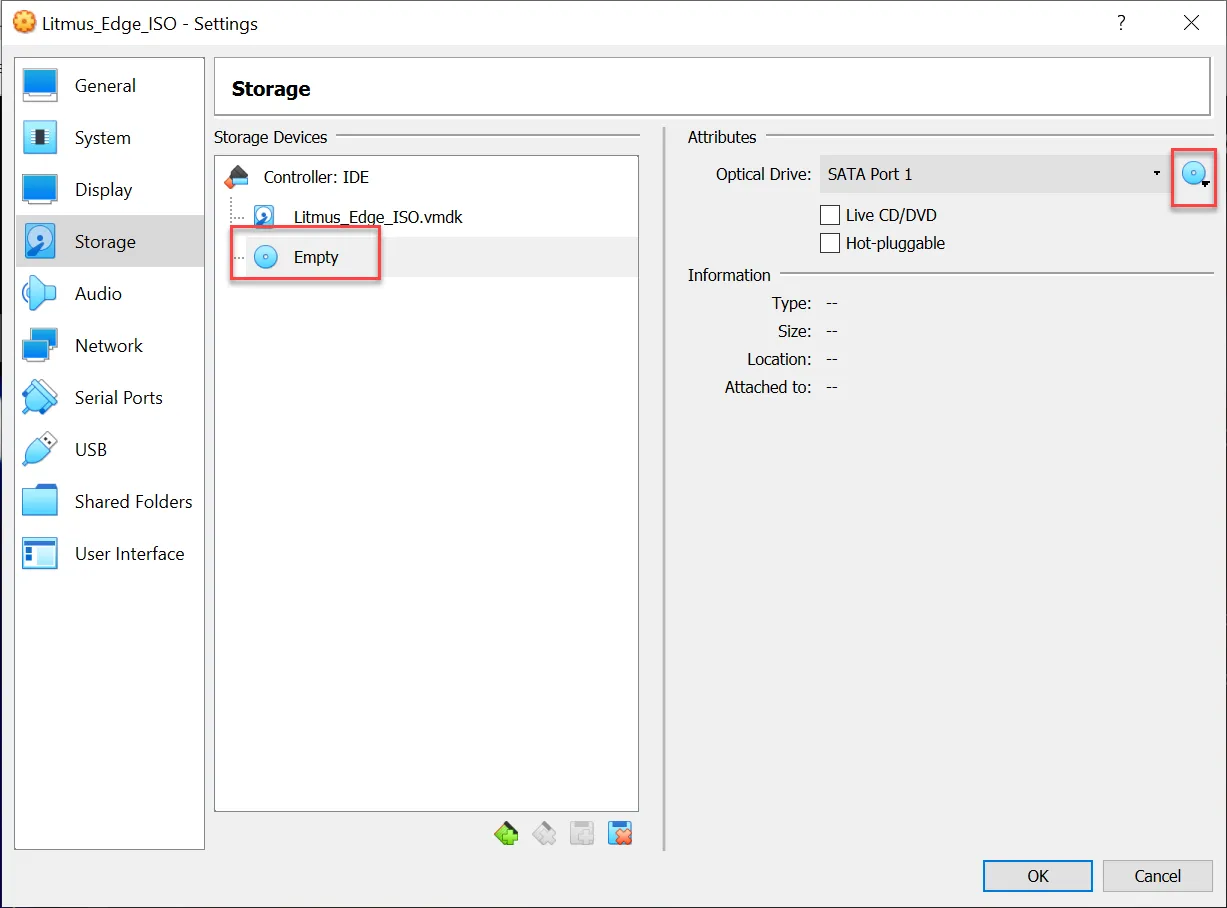 Optical settings
Navigate to the ISO file from which you want to install, and then click Open. The Optical drive in the Storage Devices section displays the name of the ISO file you selected.
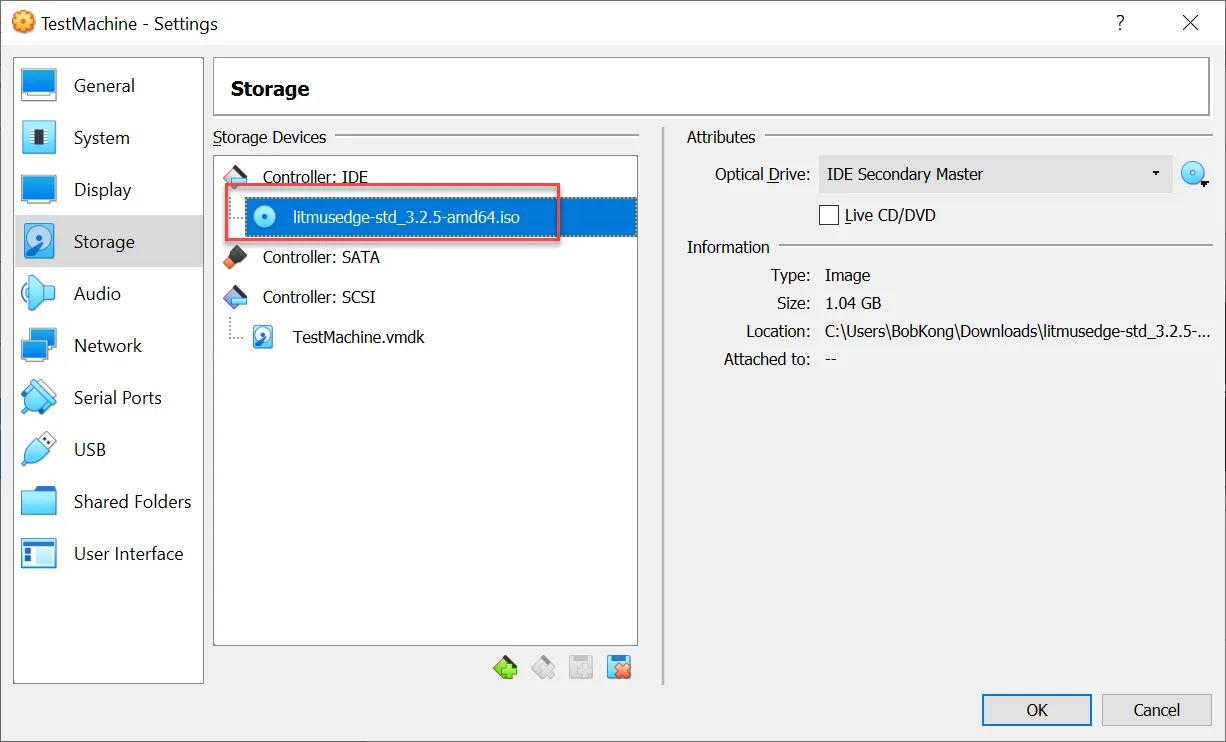 ISO file listed in Controller: IDE
Step 2c: Configure Audio Settings
- From the left pane, select Audio.
Clear the Enable Audio Output checkbox.
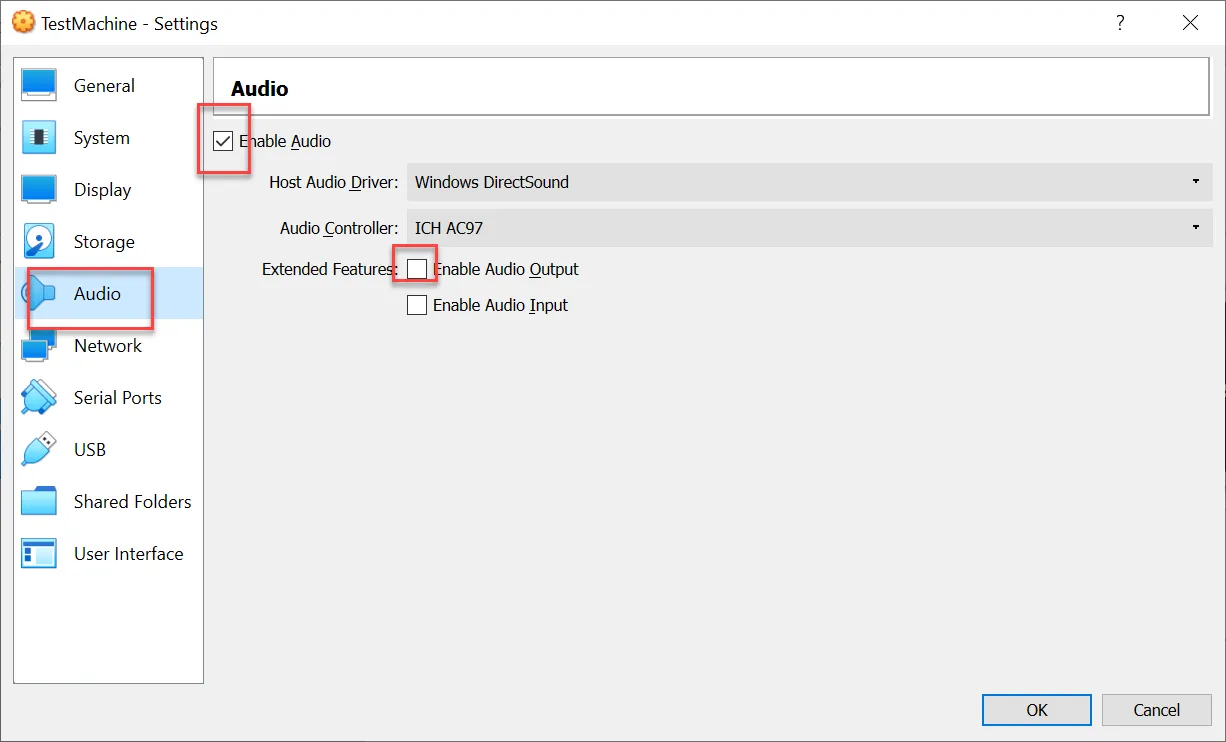 Audio settings
Step 2d: Configure Network Settings
- From the left pane, select Network.
- Click the Adapter 1 tab.
- Select the Enable Network Adapter checkbox.
- From the Attached to drop-down list, select Bridged Adapter.
Select the appropriate network card name from the Name drop-down list.
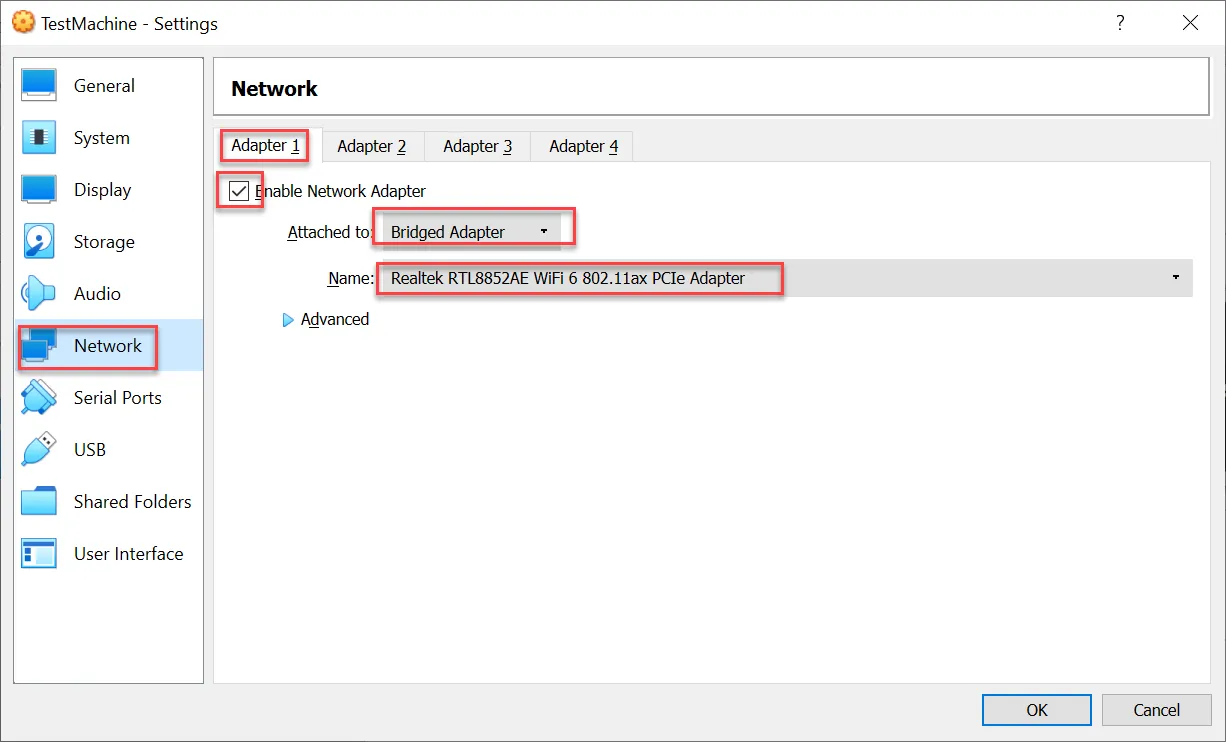 Network settings
- Select the Adapter 2 tab.
- Select the Enable Network Adapter checkbox.
From the Attached to drop-down list, select NAT.
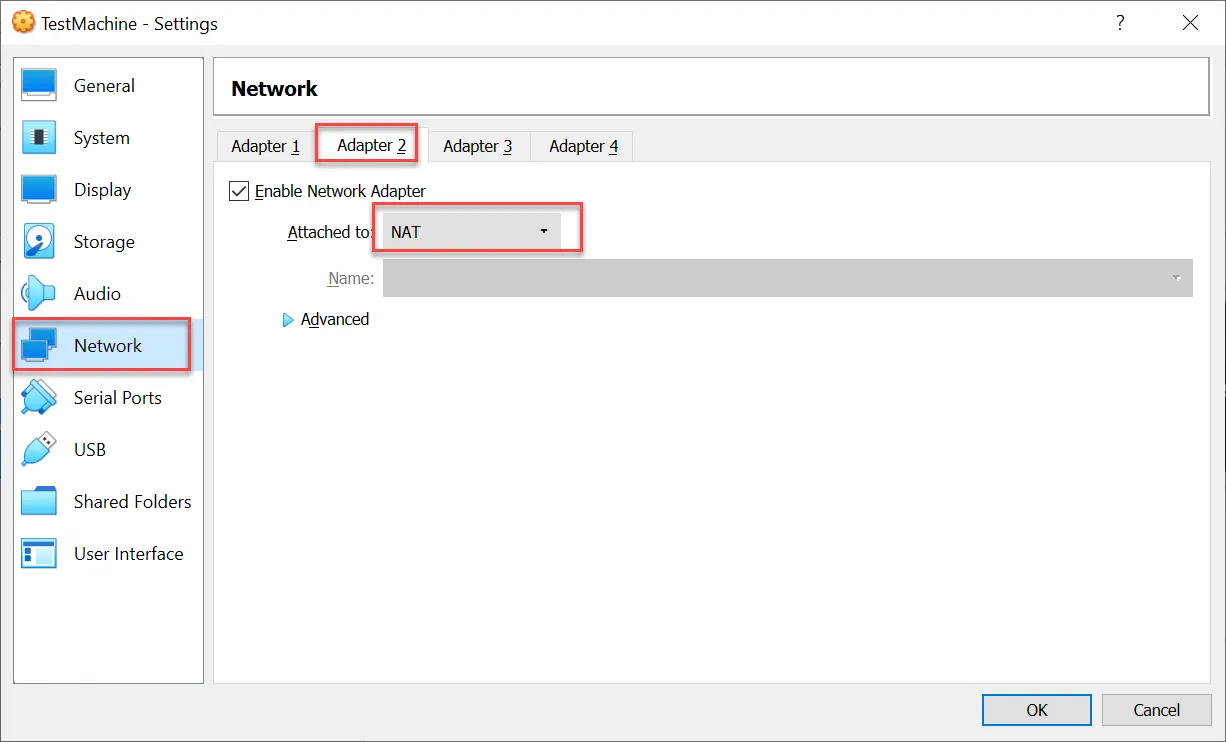 Adapter 2 tab
Step 2e: Configure USB Settings
- From the left pane, select USB. The USB pane appears on the right.
Deselect the Enable USB Controller checkbox.
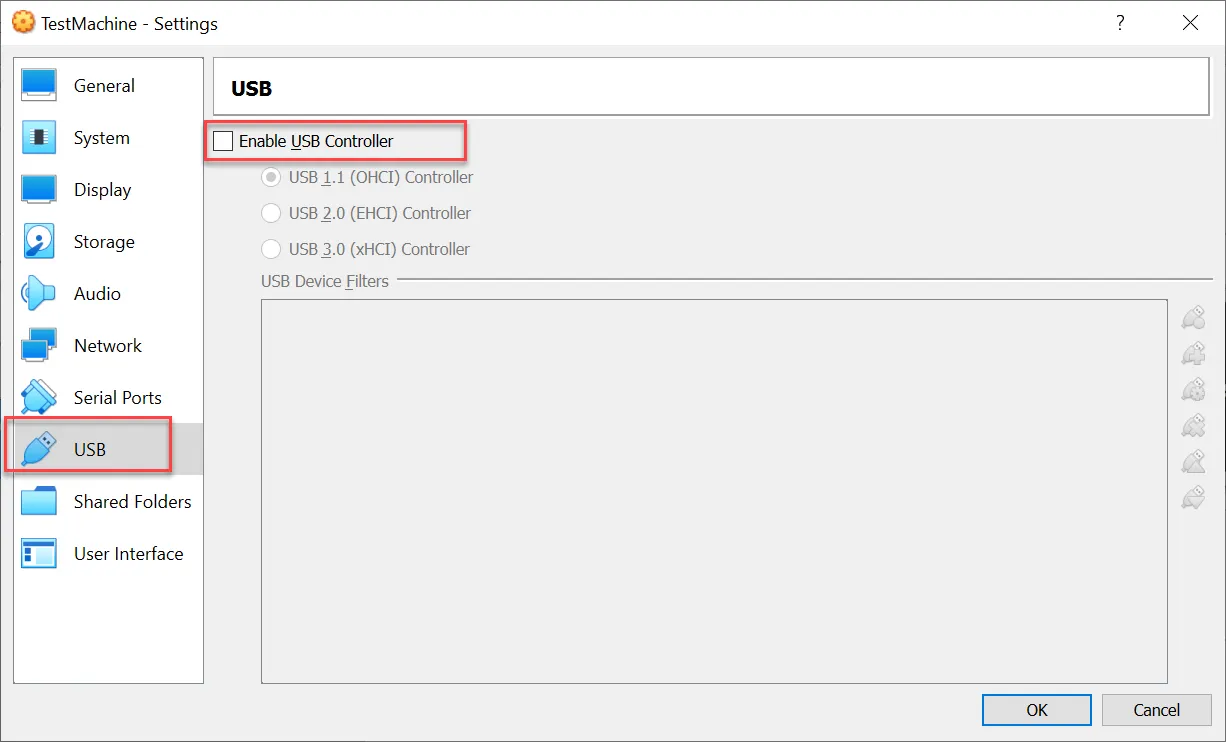 USB settings
- Click OK.
Step 3: Run the Operating System Installer
You will run the operating system installer that will install Litmus Edge.
Notes:
- During the installation, the progress bar may decrease at times due to partitioning.
- The time to complete the installation is based on the size of the hard disk drive. Large disk drives will cause the installation to take longer to partition the disk and therefore longer to complete setting up the virtual machine.
To install the ISO file:
- From the Oracle VM VirtualBox Manager window, select your VM and click Start on the toolbar.
If prompted, select the ISO file you added to the Optical device in the Storage settings, then click Start. If the Start button does not close the prompt box, click Cancel. This will not interfere with the installation. The Terminal User Interface (TUI) appears. If a message appears warning you that the mouse you are using is not supported in TUI, ignore it. You can navigate the TUI using arrow keys and make selections by pressing the ENTER key. During loading, the Terminal User Interface may display the following warning/error messages. These can be ignored.
 Warning/error messages
After the device initiates, respond to the questions in the TUI. Enter No to continue with the installation using the graphical interface.
 Question asking if you are installing over Serial interface
Select Install Operating System, and then select Ok.
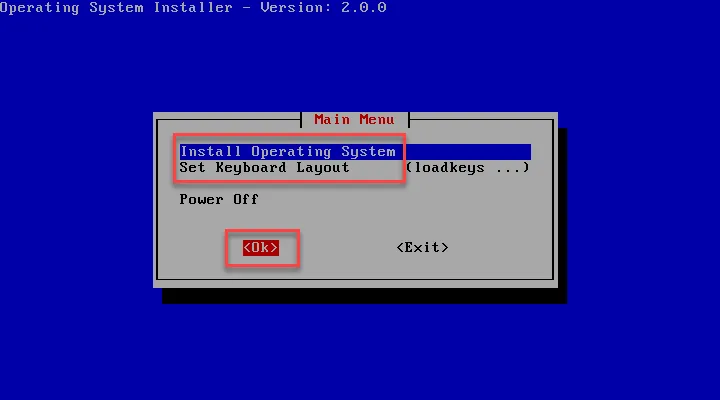 Install Operating System message
Select the partition to install, and then select Ok. The list is device-specific. Typically, the installation location is sda. If the device/gateway has embedded MMC (eMMC) components, the partition name may be listed as mmcblk instead of sda. Make sure you select the correct hard-drive location.
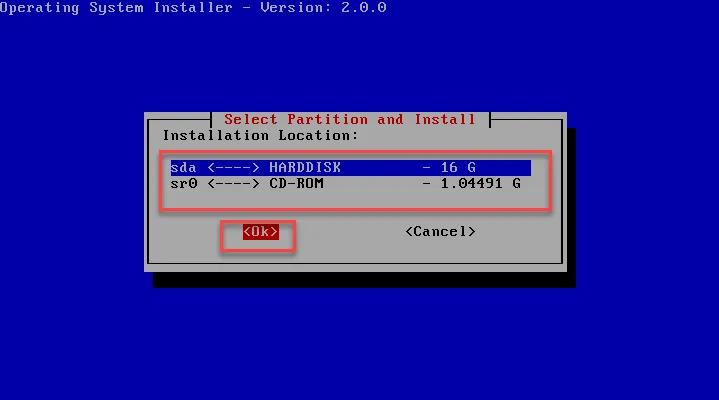 Partition selection option
Select Yes to verify the OS installation location. If you select No, you return to the beginning of the installation.
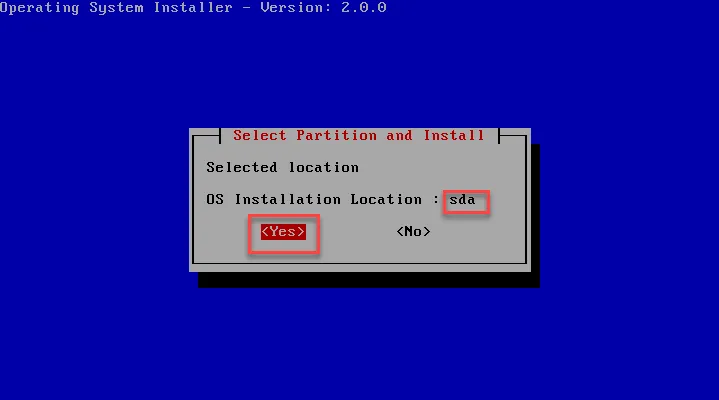 Select Partition and Install message
Select Yes to continue formatting the device and installing the operating system. The installer indicates its progress followed by a success message.
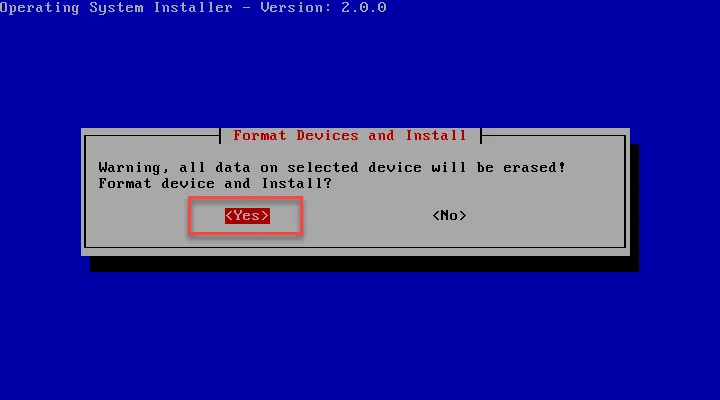 Format Devices and Install message
After installation, the Terminal User Interface may display the following warning/error messages. These can be ignored.
 Warning/error messages
Select Yes to power off the device.
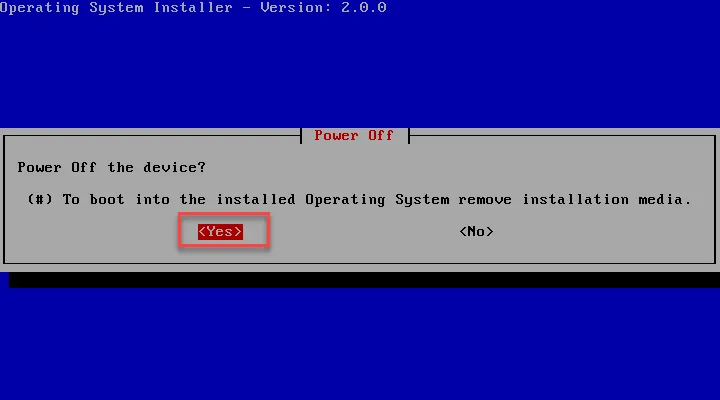 Power Off message
Step 4: Run Litmus Edge on the Virtual Machine
Once the ISO file is successfully installed, you can run Litmus Edge on the virtual machine.
To run Litmus Edge on the virtual machine:
- You will need to remove the ISO file from the Optical drive. From the Oracle VM VirtualBox Manager window, select your VM on the left pane. On the right pane, click the [Optical Drive] text in the Storage section. The selected file turns blue.
Right-click the file and deselect the ISO file. The Optical Drive shows empty.
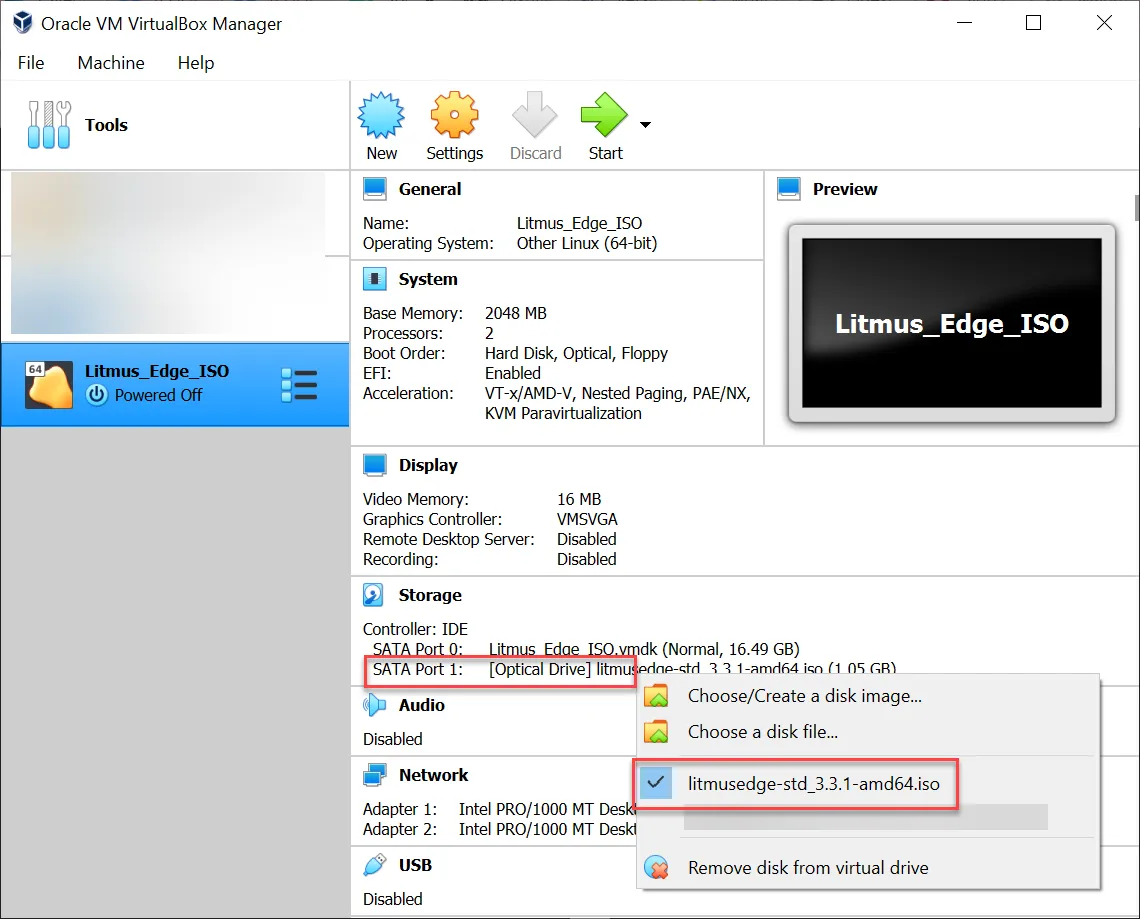 Optical Drive settings
- In the System section, select Boot Order.
Highlight Hard Disk, click the Up arrow to move the Hard Disk to the top, and then click OK. The order should be Hard Disk, Optical, and Floppy.
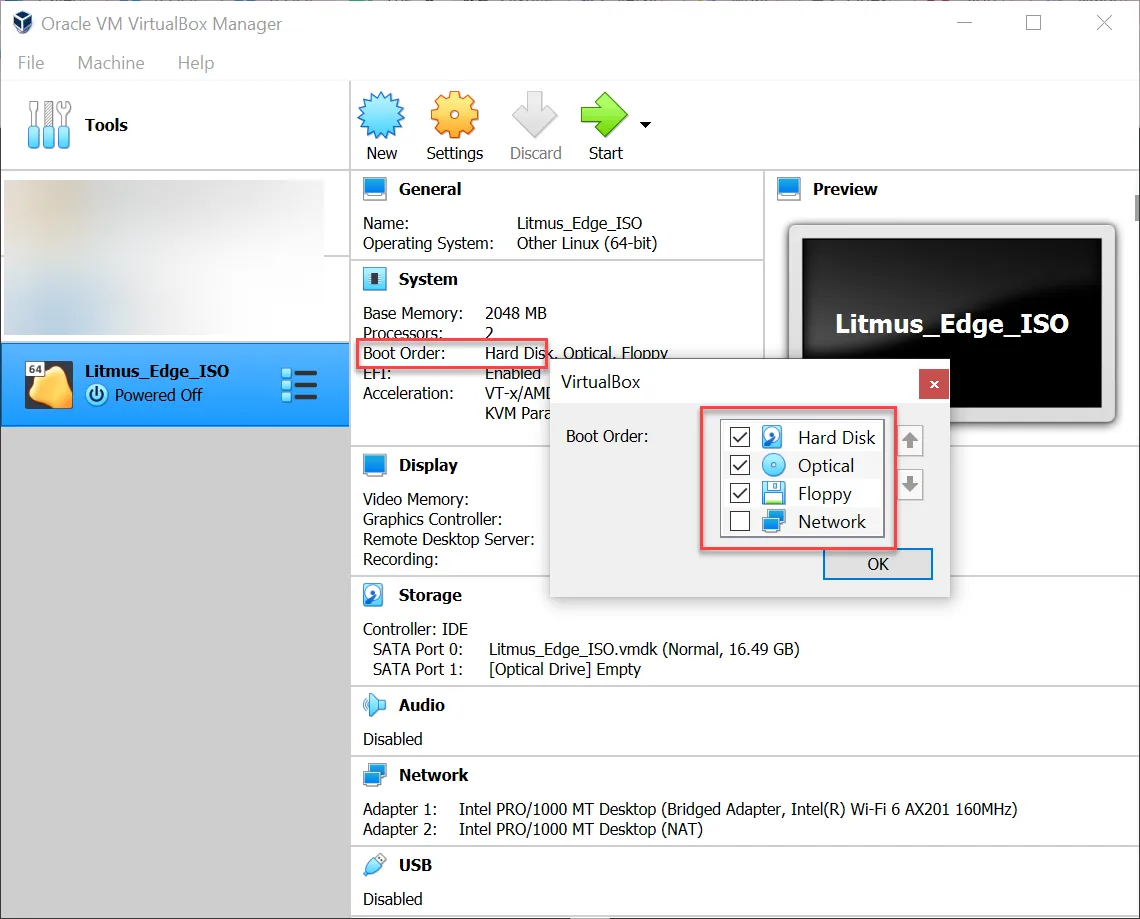 Boot Order settings
Click Start.
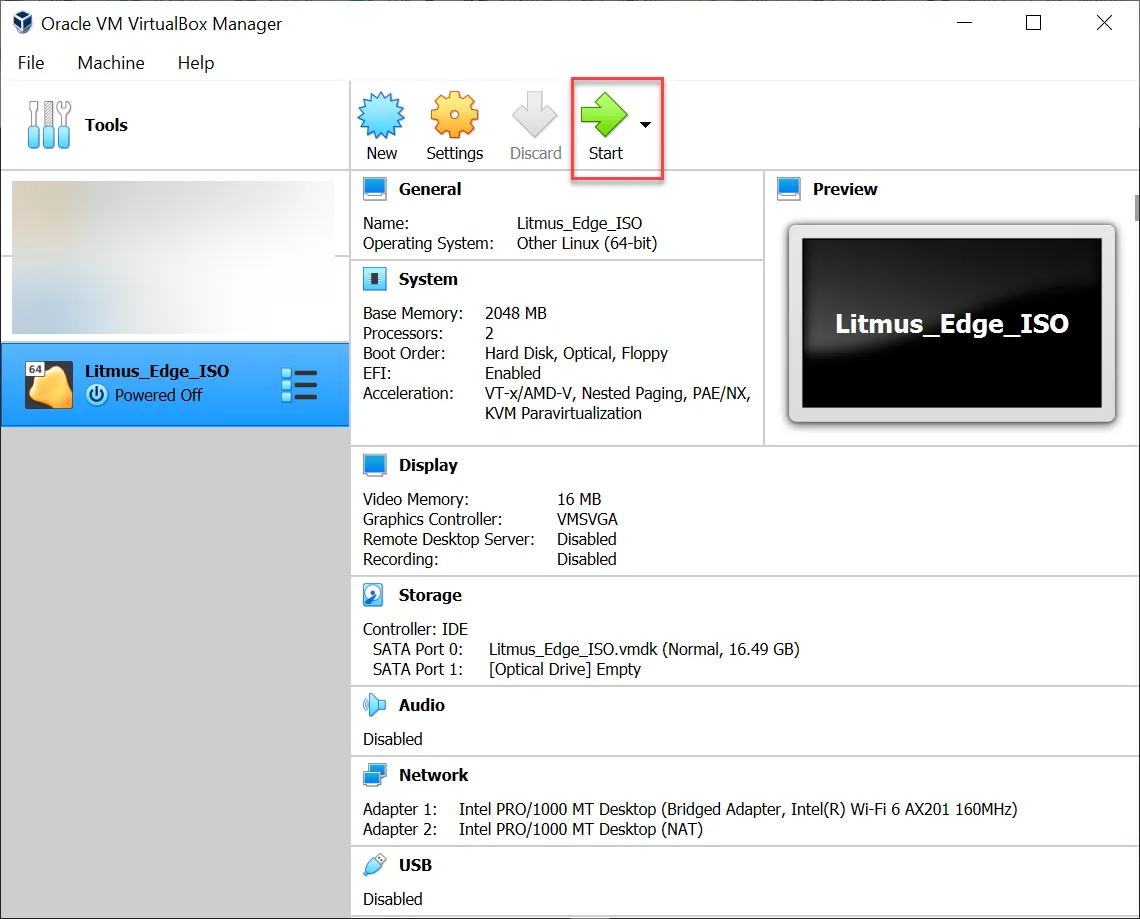 Start VM
During loading, the Terminal User Interface may display the following warning/error messages. These can be ignored.

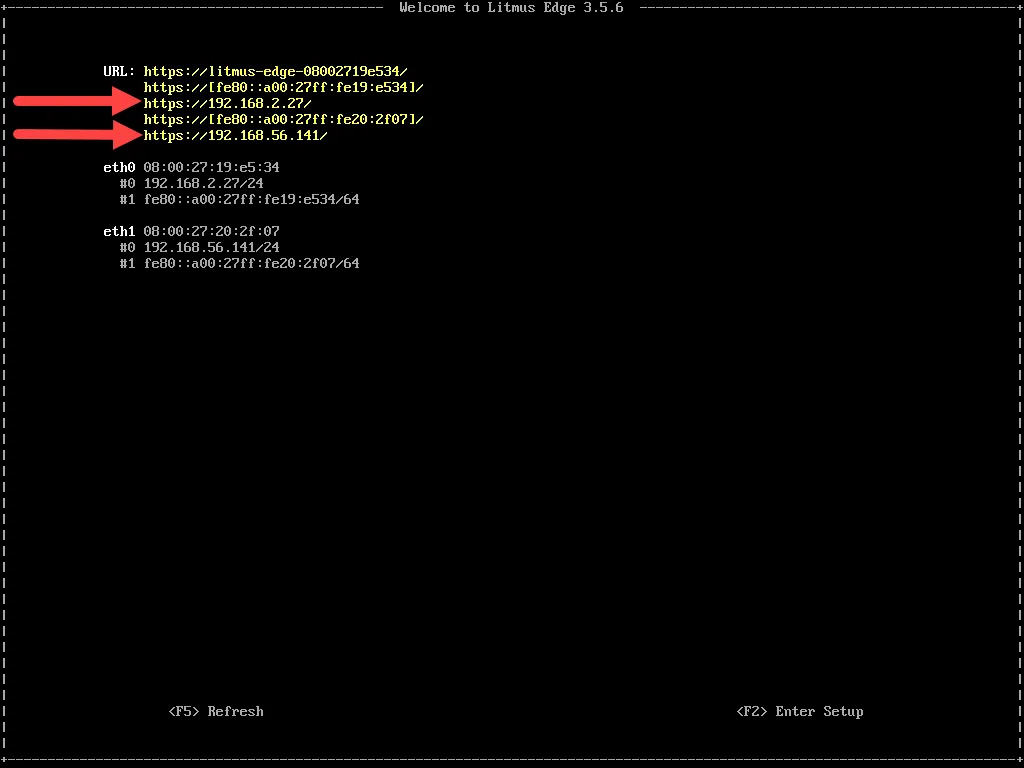
The VM starts up and the terminal window displays the URLs to be used to access the edge device through the Web UI. If several URLs are shown, use the first one.
Step 5: Log in to Litmus Edge
- See Access the Terminal User Interface for instructions on how to navigate and log in for the first time.
Troubleshooting
If you don't see an option for a 64-bit version and only see a 32-bit version, refer to VirtualBox only Showing 32-bit and no 64-bit Versions.