Connect a Device
Connecting a device to Litmus Edge allows DeviceHub to collect data from the device using the appropriate industrial driver. Once connected, the device's data is normalized and published to the message broker, where it becomes available for flows, analytics, integrations, and other platform features.
Before connecting a device, make sure it is physically configured and that you have its connection parameters. Refer to the Industrial Systems Connection Guide and locate your device for specific instructions.
Connect a device by selecting a driver, entering its connection parameters, and configuring optional properties like metadata, alias topics, and logging. Once created, DeviceHub begins collecting data from the device immediately.
Video
Connection Types
Litmus Edge supports the following device connection types:
Connection Type | Description |
|---|---|
Ethernet | Connects to devices over TCP/IP using an IP address and port number. The most common connection type for modern PLCs and networked industrial equipment. |
Serial | Connects to devices over a serial interface (RS232, RS485). Requires a communication port, baud rate, data bits, parity, and stop bits. |
CAN | Connects to devices on a Controller Area Network (CAN) bus. Requires a CAN bus module to be present on the hardware. |
File-based | Connects to data sources through a shared file path, such as a network share. |
Step 1: Select Device to Connect
You will first need to select the device type you want to connect and enter a name and description.
To connect a device:
- Navigate to DeviceHub > Devices.
- From the DeviceHub pane, click the Connect a Device box. The Connect Device dialog box appears.

- Click the Device Type drop-down list and select a Device Type from the list.
- Click the Driver Name drop-down list, and select a Driver Name from the list.
- Enter a name and description for the device. The name can have numbers, uppercase and lowercase characters, and special characters. It can't start or end with whitespaces.
Step 2: Define Device-Specific Parameters
Depending on the type of device you are connecting, you will need to define specific parameters.
Refer to the following resources for information on specific drivers and how-to guides:
Important: If you are connecting a device with a serial connection and using an RS232 to USB adapter, only those with FTDI chips are recommended. Other adapters are not validated or recommended. If Litmus Edge doesn't have the driver for the adapter you are using, you will not be able to install it separately.
Asset Discovery Tool
Depending on the device and driver you select, you may have the option of using the Asset Discovery Tool, which searches for devices and pre-fills network parameters to connect the device to Litmus Edge.
Refer to the table below for the required and optional parameters for device types.
Device Type | Required and Optional Parameters |
|---|---|
Ethernet device |
|
Serial device |
|
CAN device |
|
File-based device |
|
Step 3: Additional Attributes
You have the option of configuring the additional attributes of metadata and status register settings.
Meta Data
The Meta Data option summarizes basic information about data. It enables you to define, modify or delete key-value pair data for the device output payload later on. It can then be used to find, use, and reuse particular instances of data.
Note: If you use special characters in meta data key names, the special characters are replaced with underscore characters in the payload. This can cause two key names to be combined into one. For example, configuring the key names a**b and a&&b will cause only one key name to be created (a__b).
See Organize Device and Tag Data by Using Metadata to learn more.
If you enable Meta Data, the section expands with parameters to complete. By default, the list of Meta Data key-value pairs displays No records defined.
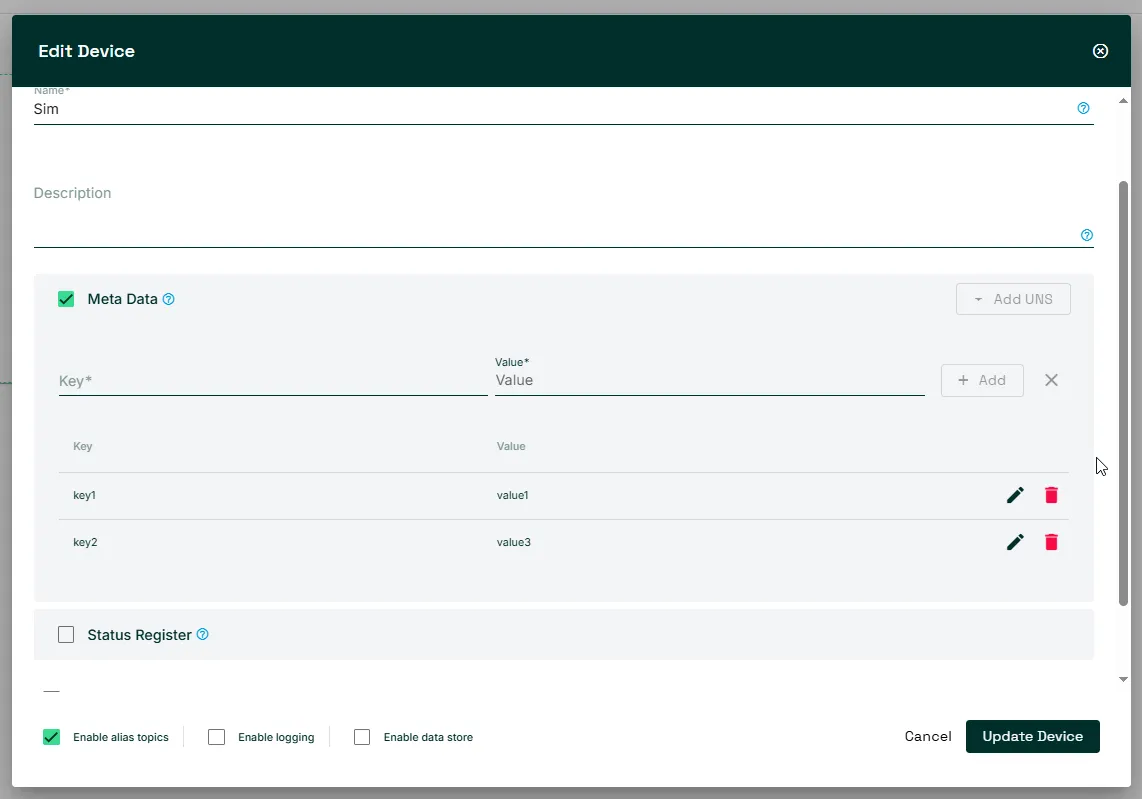
To define meta tags:
- In the Key field, enter the meta tag key.
- In the Value field, enter the meta tag value.
- Click + Add.
- Continue adding key-value pairs you want to add.
Status Register
The Status Register option allows you to define a register for keeping track of the device status (either connected or disconnected).
See Use the Status Register to Connect a PLC to learn more.
If you select the Status Register check box, the section expands. The parameters to configure depend on the specific device and tag parameters. See the Industrial Systems Connection Guide and refer to the Tag Parameters section for the device you are configuring.
As long as the above register responds to polling by DeviceHub, the device appears in the UI as Connected, regardless of the status of any other tags added to that device.

Step 4: Optional Settings
You have the following optional settings you can configure for the device.

Enable Alias Topics
The Enable alias topics option allows you to substitute long, unreadable device and tag IDs with human-readable device and tag names in topic names. See Default Topics and Descriptions for more information.
The Enable alias topics check box is selected by default.
Notes:
- When you enable alias topics, DeviceHub stops publishing to raw topics and publishes only to alias topics.
- Litmus Edge substitutes all special characters in aliases with "_" (underscore).
- When alias topics are enabled for a device, you can't use batch write topics. To use batch write topics, you must not select the Enable alias topics check box in the device configuration. See Default Topics and Descriptions for more information.
Enable Logging
The Enable Logging option is available only for Gen 2 drivers. Once you connect the device, click the device tile and select the Logs tab to view the log.

Enable Data Store
The Enable Data Store option allows you to define how long you want to store data locally.
To enable this option, select the Enable Data Store check box, and then define the number of hours in the Retention Hours field.
After creating the device, a data store icon appears in the top-right corner of the device tile.

Publish on Polling Interval
Note: This option is only available for Gen 2 drivers.
- If this option is selected, the driver will always publish messages according to the polling interval configuration. If the driver has not completed the request to read the data at a polling interval, the payload will have a success=false message.
- If this option is not selected, the driver will not publish a message at the polling interval if the request to read data has not completed.
Watchdog
Note: This option is not available for all drivers. For example, drivers that act as servers don't have this option, such as Industrial OT Server and OSI Agent.
If this option is selected, the driver will be monitored based on the Watchdog period (in seconds) you configure. If an issue is detected, then the driver will restart.
Publish Additional Attributes
This option is disabled by default. Users can enable or disable this option, which includes the status code, source timestamp, and server timestamp in the new DeviceHub payload fields.
Note: This option is only available for the following Gen 2 drivers:
- OPC UA
- BACnet
- DNP3
- Modbus
- Source Timestamp: This option reflects the exact time the data source applied the timestamp to a variable value. If selected, the driver will ensures accurate tracking of when data was generated and allows for better incident analysis.
- Server Timestamp: This option captures the moment the server received the value, providing additional information for the timing of data accuracy and reliability.
- Status Code: This option indicates the quality or state of the data being received, helping users identify any errors or issues with communication.
Step 5: Create Device
When done defining the new device, click Create Device. A tile for the new device appears in the Devices pane. A green CONNECTED indicator means that a connection to the device has been established. You can stop a device to disconnect it.
If you have connectivity issues, see Device Connectivity Issues for troubleshooting information.